Making Shaker Style Base Cabinets
Why would anyone make their own cabinets? They’re pretty cheap at the home improvement stores.
Well, that is… until you want them to:
Be made from plywood and NOT be made out of particle board, so they can survive the first drop of moisture (they are in a kitchen after all)
Look nicer than the builder basic cabinets featured in every rental property ever
Customize the dimensions to the space you have, etc. etc.
Then kitchen cabinets quickly become VERY expensive
In this video we’re making custom shaker style base cabinets using simple woodworking techniques. The goal was to keep them accessible so even beginning woodworkers could tackle this project and I think we’ve pulled that off! No large dado slots, no rabbet cuts for the doors, mostly plywood rectangles and pocket holes! After watching you’ll be able to recreate these cabinets for yourself!
On second thought… why don’t more people make their own cabinets? 😋
Resources:
Disclaimer: The following post contains affiliate links. If you purchase a product through one of the links, I may receive a small commission (at no cost to you) that I can use to feed the platypus. And it’s always hungry.
(most materials available at your local home improvement store)
3/4" 4x8 Plywood
1/2" 4x8 Plywood
1/4" 4x8 Plywood
3/4" 4x8 Maple Plywood
1/4" 4x8 Maple Plywood
3/8" Poplar Dowel
1x8x8 Clear Pine Boards (for making trim)
Wood Filler
Wood Glue
13/16" Birch Edge Banding
5/8" Brad Nails
1-1/4" Coarse Thread Pocket Hole Screws
13/16" Maple Edge Banding
Primer
Semi-Gloss Alkyd Paints (White, Admiral Blue)
22" Full Extension Drawer Slides
Soft Close Frameless Cabinet Door Hinges
Double Sided Tape
Cabinet Pulls
(in order of appearance in the video)
Portable Circular Saw
Clamping Straight Edge
Measuring Tape
Table Saw
Quick Grip Bar Clamps
Combination Square
Miter Saw
Pocket-Hole Jig
Portable Drill
Impact Driver
Wood Glue Brush
Right Angle Clamp
24" F Clamps
Drill Bits
Countersinking Drill Bits
Scissors
Clothes Iron
Edge Banding Trimmer
Utility Knife
Speed Square
Oscillating Multitool
Screwdrivers
Brad Nailer
Table Saw Push Blocks
Dust Mask
Magnetic Featherboard
Planer
Random Orbital Sander
Sanding Discs (150, 220 Grit)
Putty Knife
Bench Sander
Concealed Hinge Jig
Extra Soft Nylon Paint Brush
6" Foam Roller
Handy Roller Cup
Roller Cup Liners
Paint Respirator
Drawer Slide Jig
Spring Loaded Centerpunch
Cabinet Hardware Jig
If you liked the video be sure to give it a thumbs up on YouTube and I'd love to hear any questions or thoughts about making the cabinets you have so be sure to let me know in the comments section!
If you're not already a subscriber consider subscribing and if you want to see more projects like this one be sure to check out my other projects on this site!
Until next time, Go Billd Yourself!
Don’t miss a thing!
Subscribe to get the latest content
How to Make Deep Pull Out Garage Shelves
Make it easy to get to the back of a deep shelf!
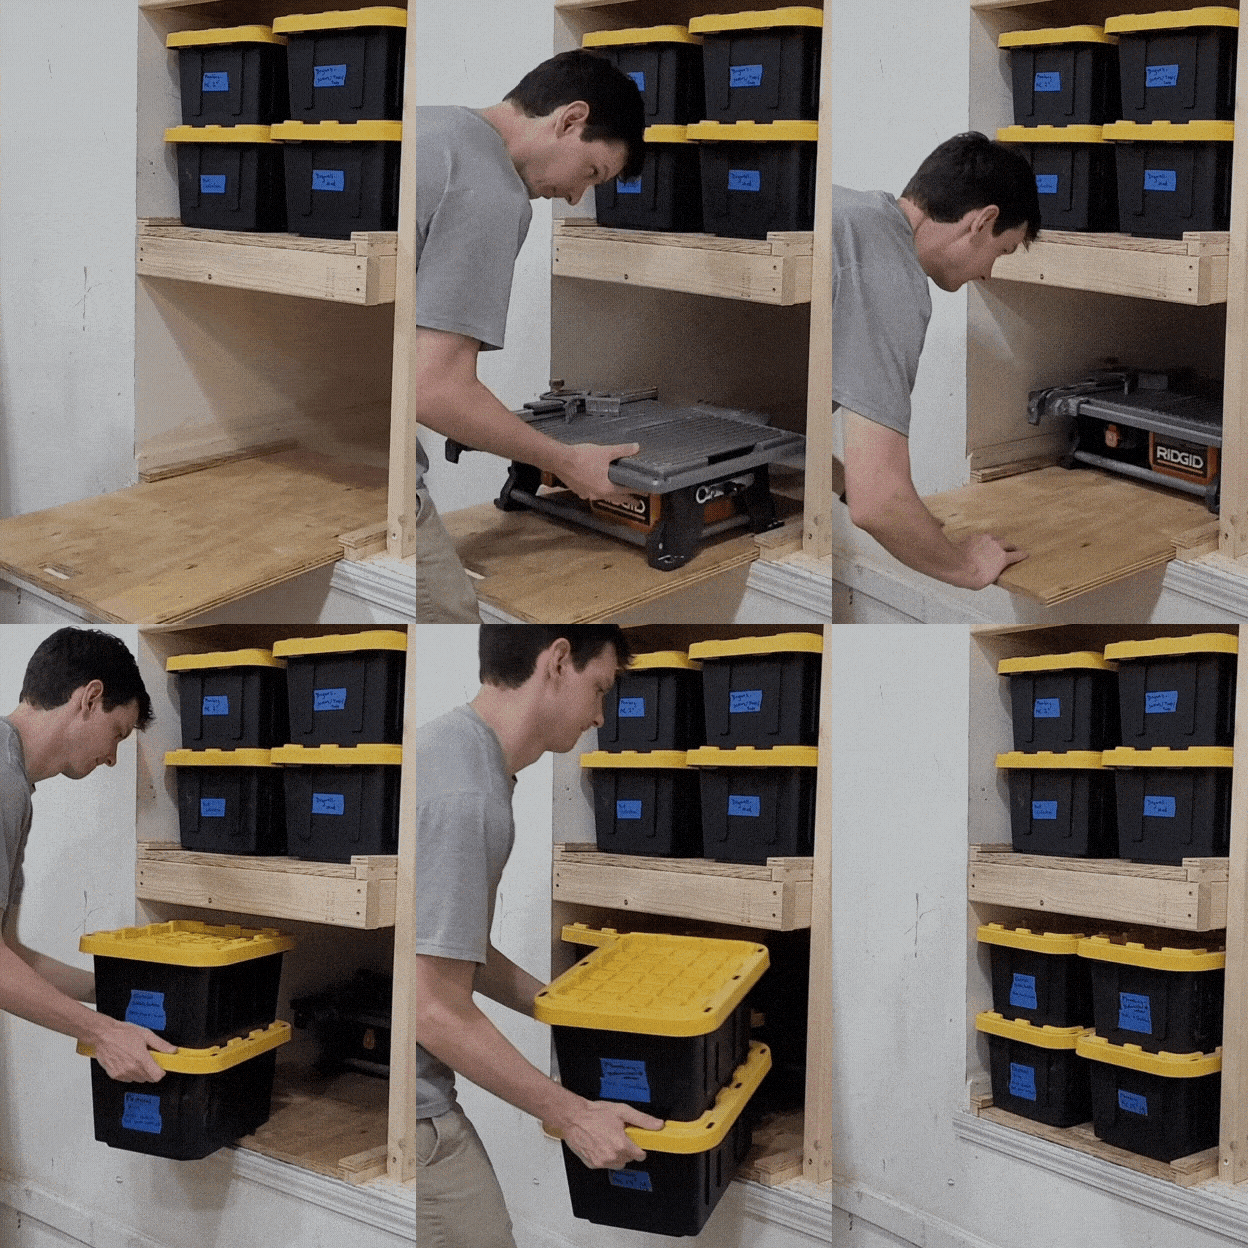
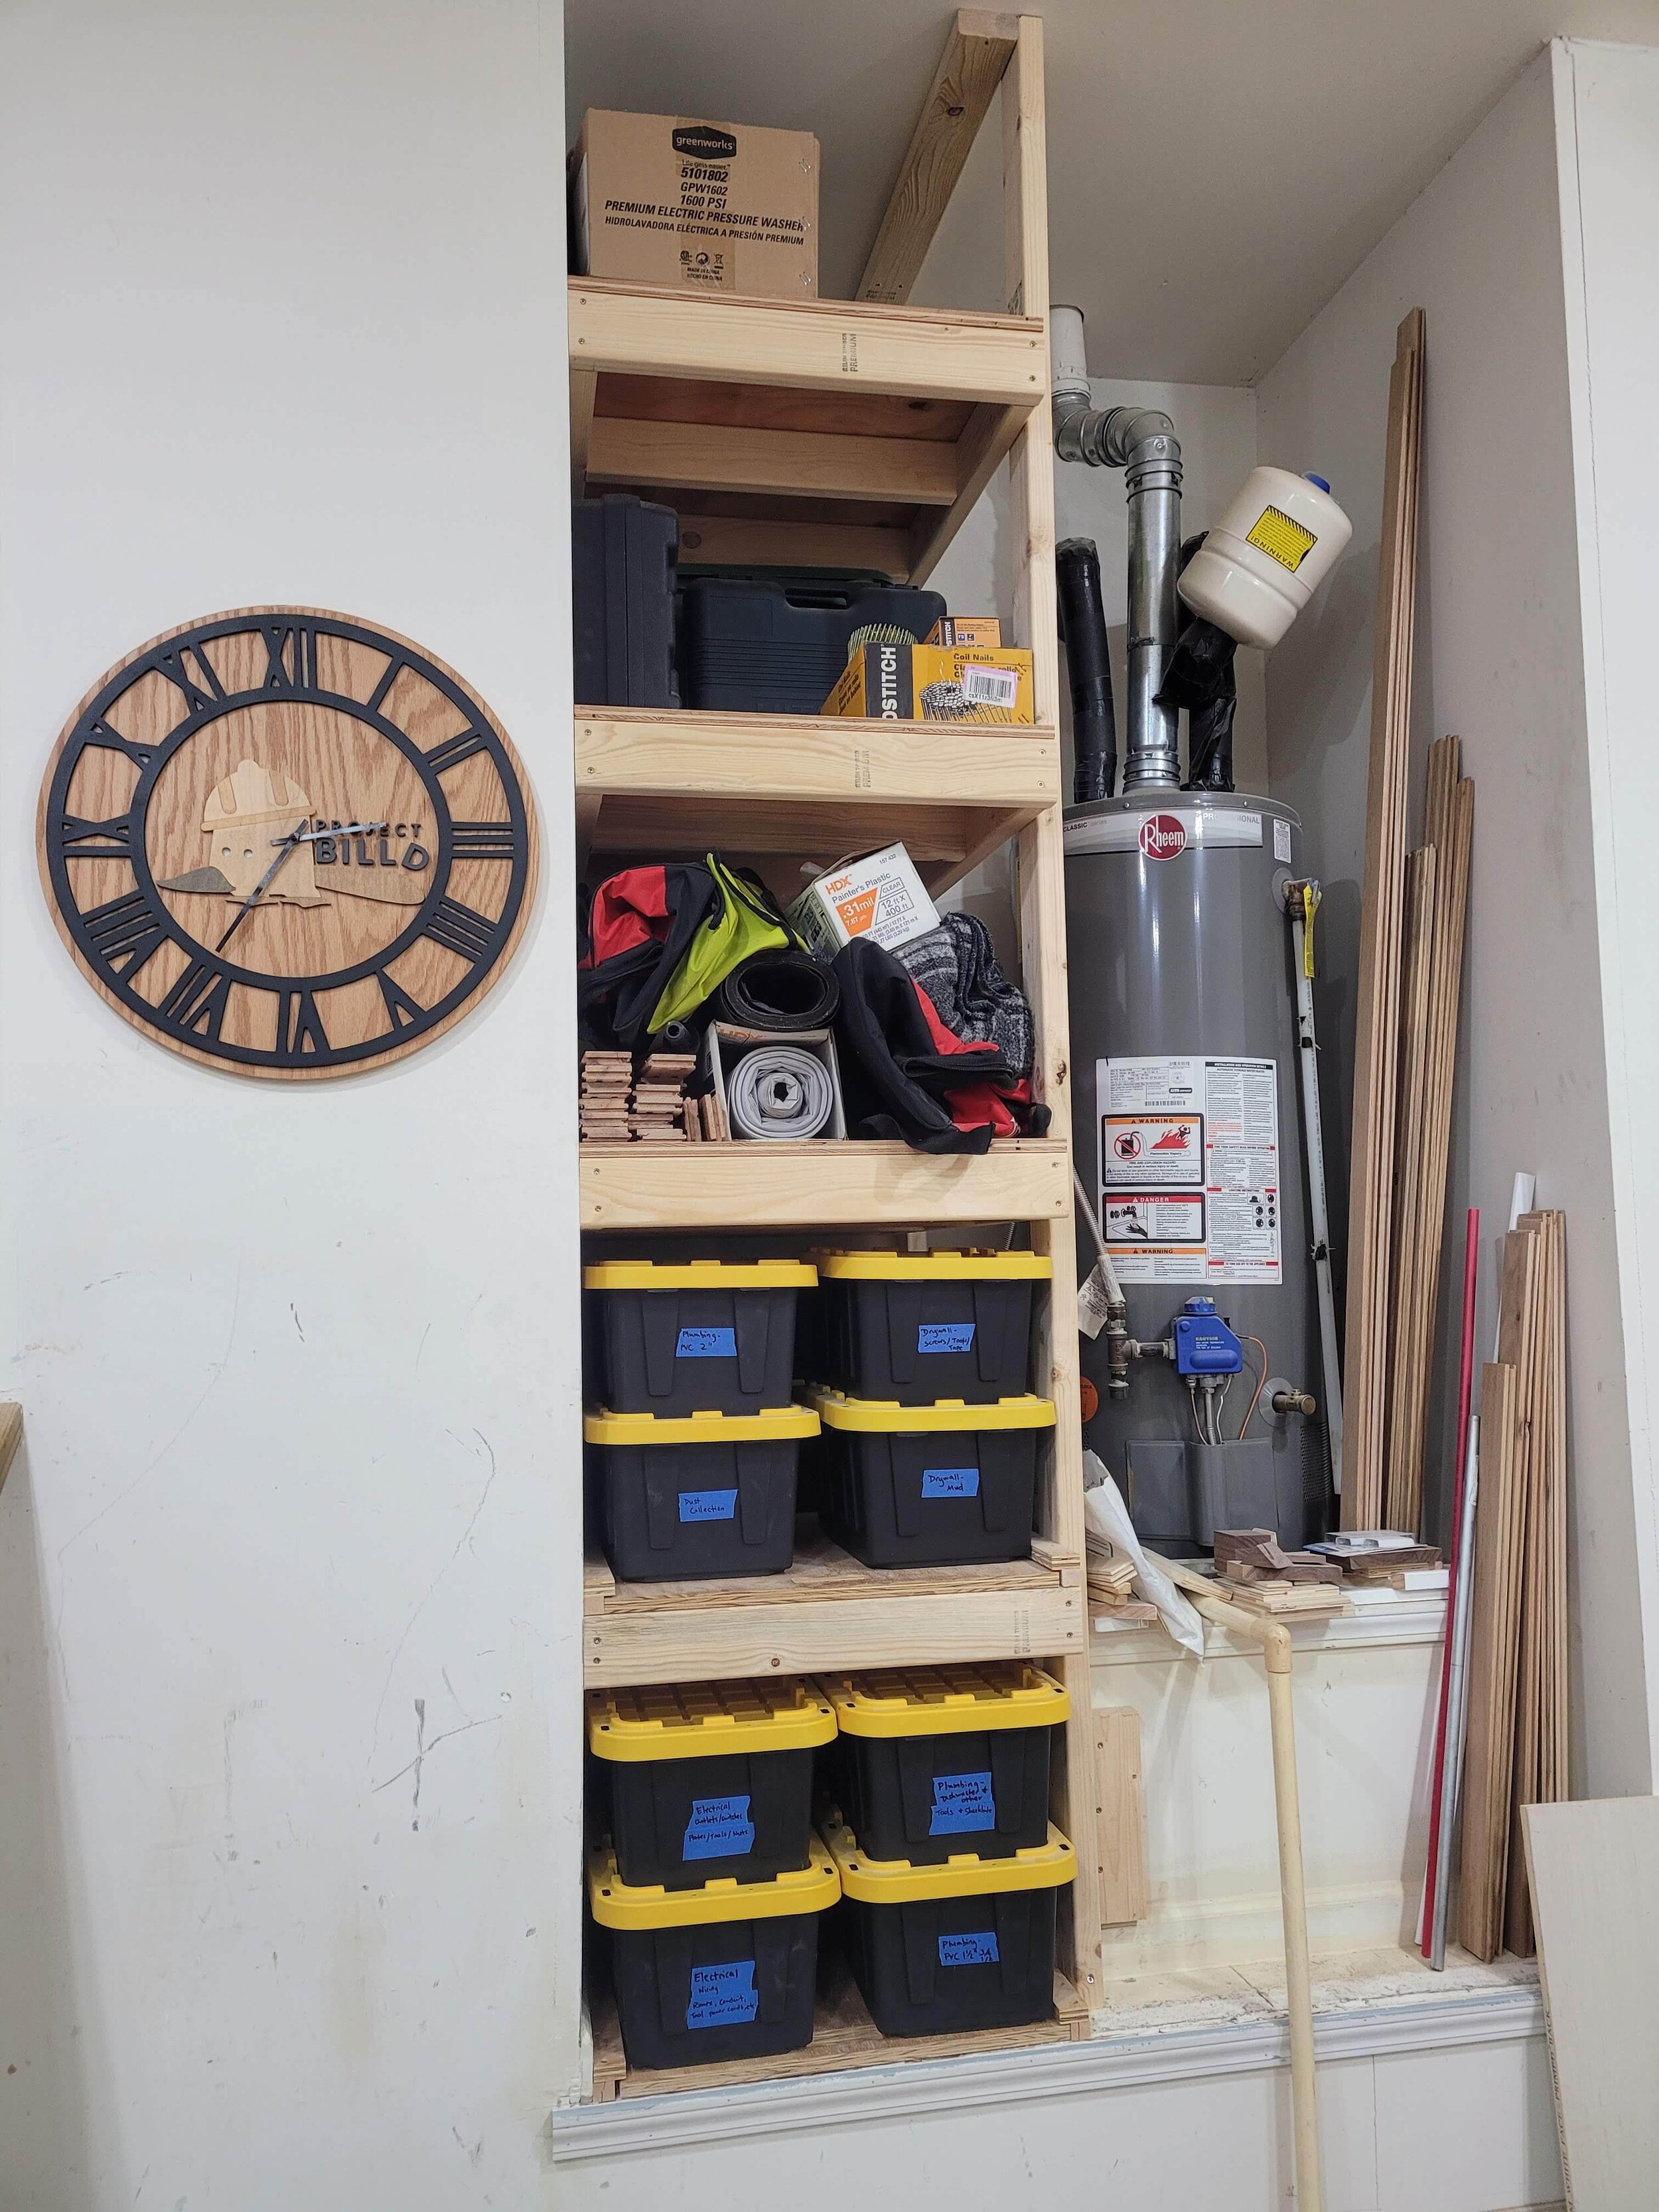
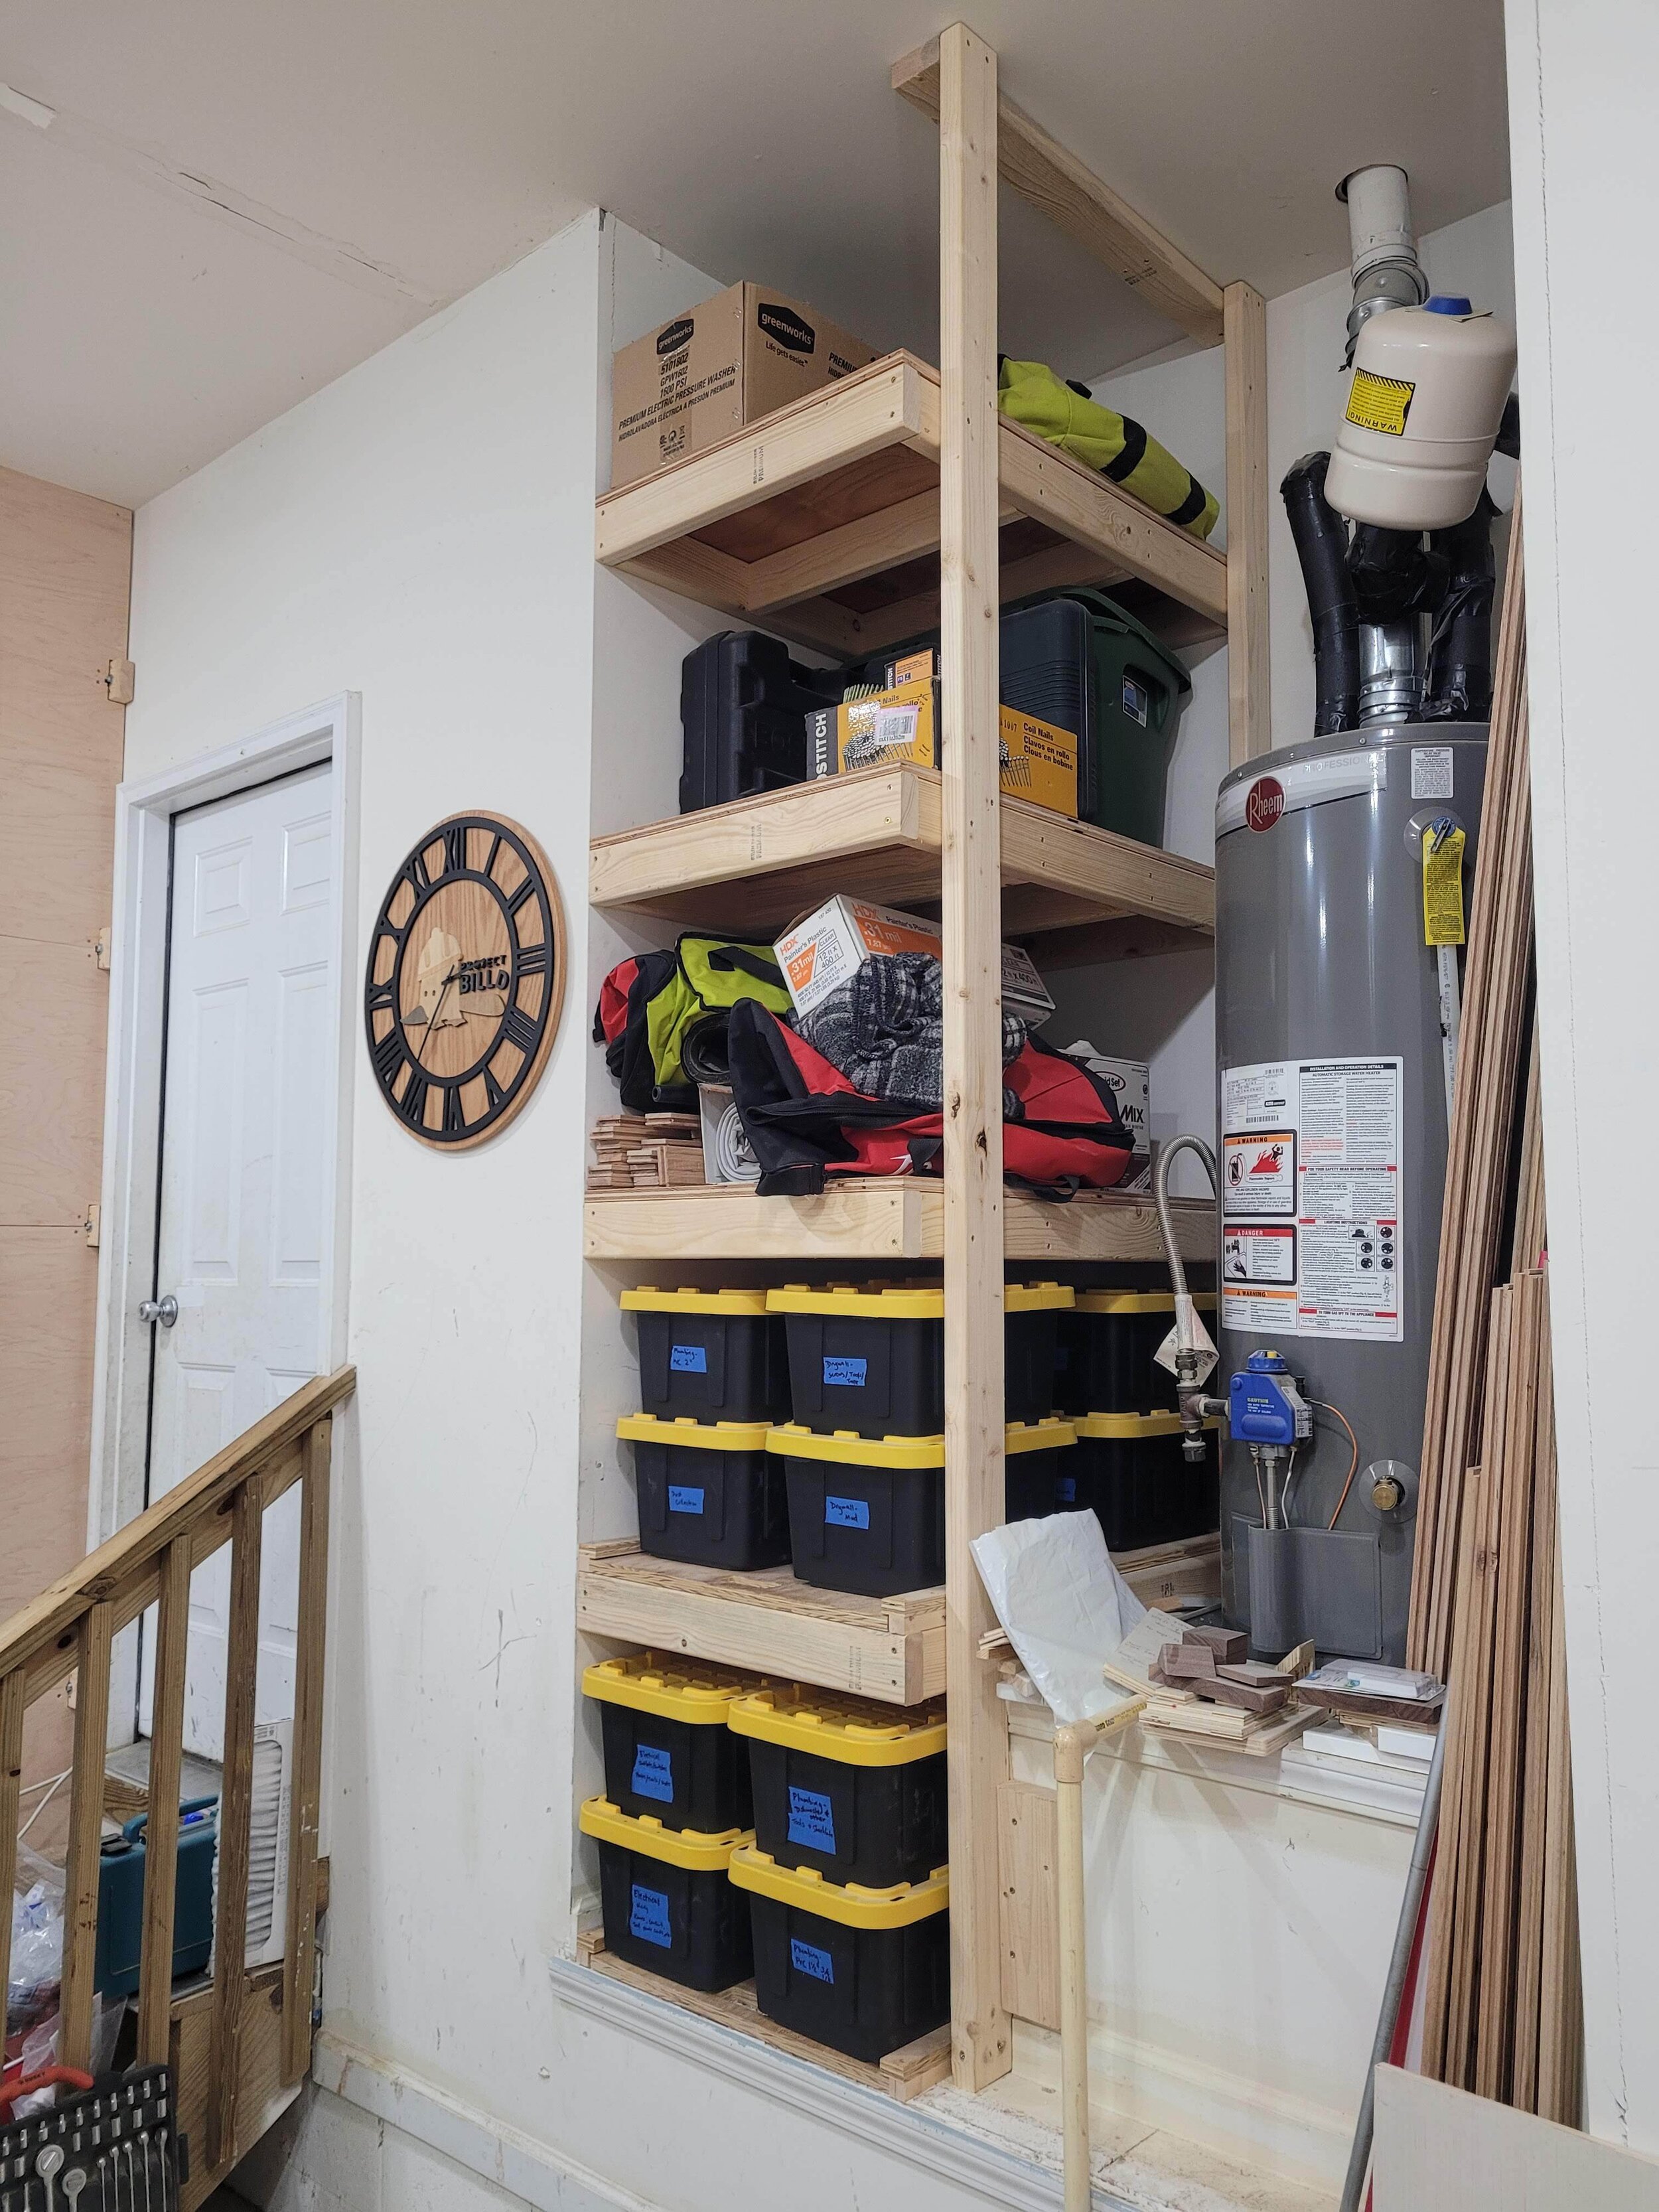
Here at Project Billd headquarters, I’m always looking for ways to make my work space more efficient. Sometimes it’s a clever solution that takes a lot of planning and sometimes it’s an obvious improvement. Building these shelves was a bit of both, as making the shelves was an obvious upgrade but having the lower shelves slide out… that’s kind of cool!
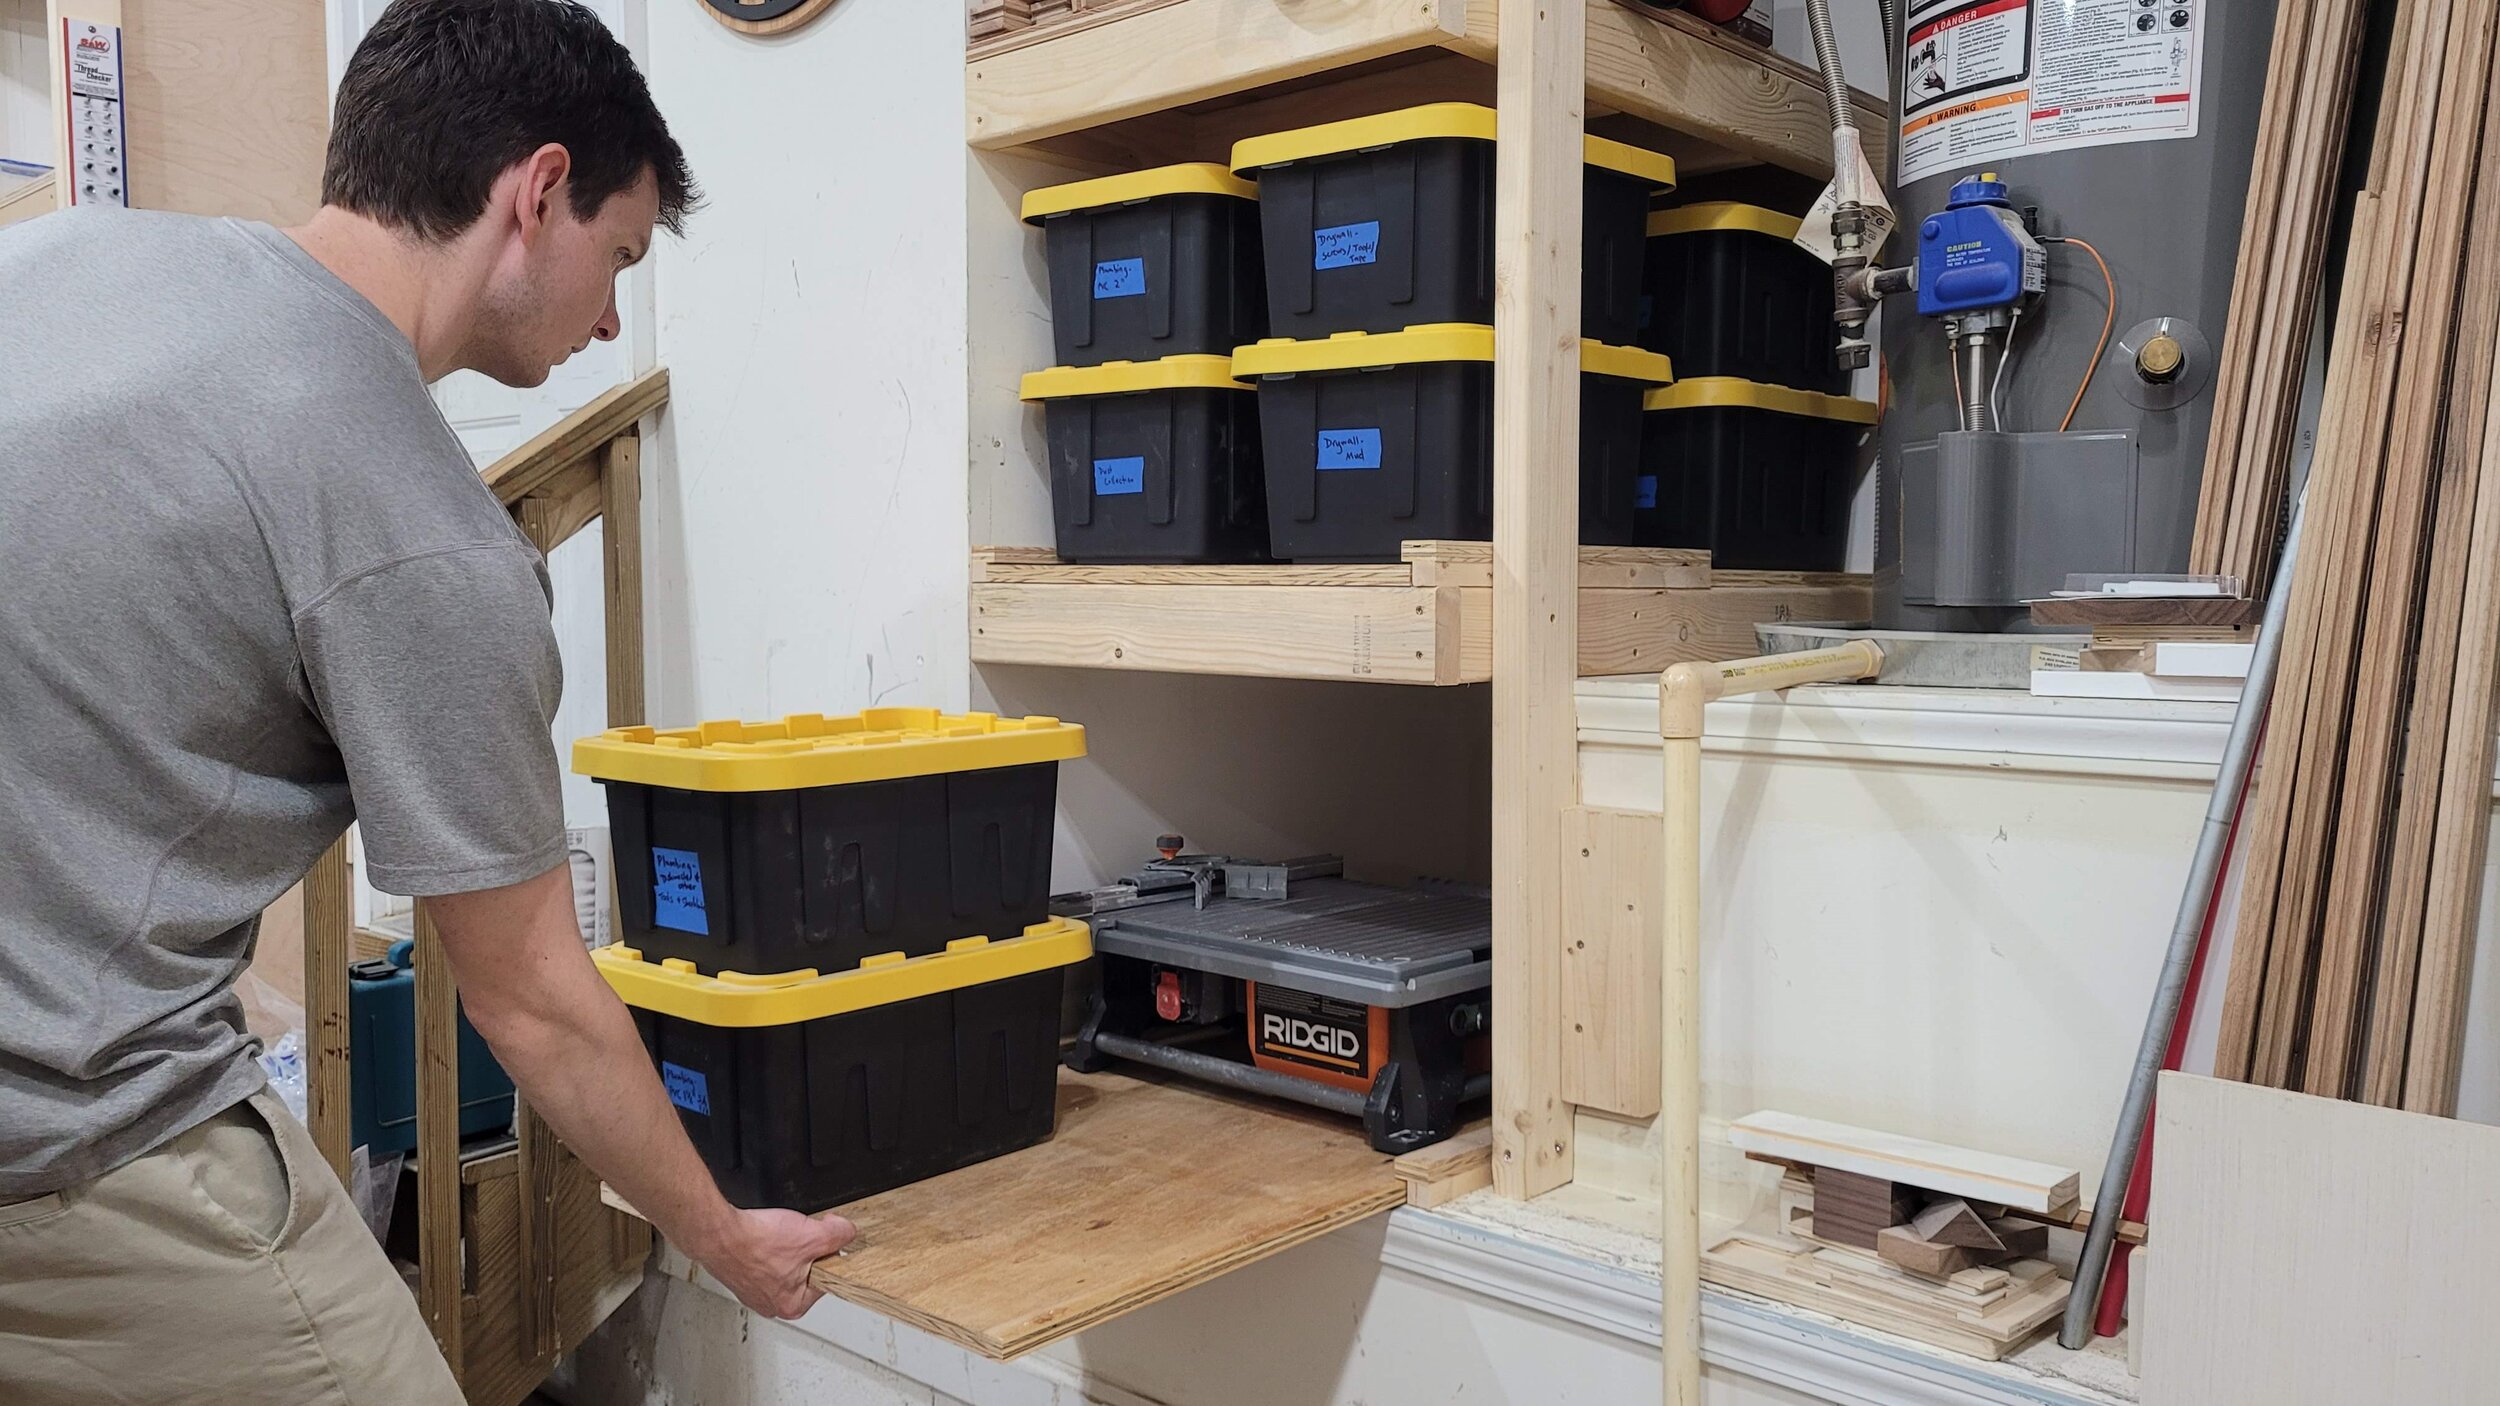
I have a deep and tall alcove in the garage that was mostly wasted storage. I wanted to come up with a simple design for a pull out shelf that allows me to reach the things stored at the back of the lower shelves so I don’t have to crouch down and crawl back in there.
The shelves give me a great place to store large seldom used tools (portable miter saw, tile saw, etc.) as well as a nice place to hide from Brady when she’s trying to get me to clean the dishes. Nobody tell her to look there, k?
Disclaimer: The following post contains affiliate links. If you purchase a product through one of the links, I may receive a small commission (at no cost to you) that I can use to feed the platypus. And it’s always hungry.
(most materials available at your local home improvement store)
2x4x8 Pine
4x8 3/4" Plywood
Construction Screws
3/4" Wood Screws
Structural (Lag) Screws
(in order of first use in the project)
Oscillating Multitool
Tape Measure
Table Saw
Countersink Drill Bits
Portable Drill
Impact Driver
Jigsaw
Speed Square
Circular Saw
Stud Finder
Level
Step Ladder
Here’s the empty space we’re working with to build these shelves. It’s just begging for an upgrade! Every space is going to be different, so if you’re going to be making similar shelves for your space, use this post as a guideline and modify the dimensions/materials/etc. as needed to make the shelves fit your space!
I started by cutting off the existing trim in line with the side of the opening using my oscillating multitool. This alcove has a subfloor already so I’m just going to put the first slide out shelf directly on top of that. If I was starting from the garage floor I’d build a shelf frame (seen later in this post) first that is just slightly off the floor (shimmed with pressure treated wood or composite material to handle moisture that might come up through the concrete slab), and then build the first slide out shelf on top of that.
I’m making a track out of wood to hold the shelf in place and let it slide. I’m calling them slide guides, say that 5 times fast!
slide glides sly glys sigh glys sly guy shy guy
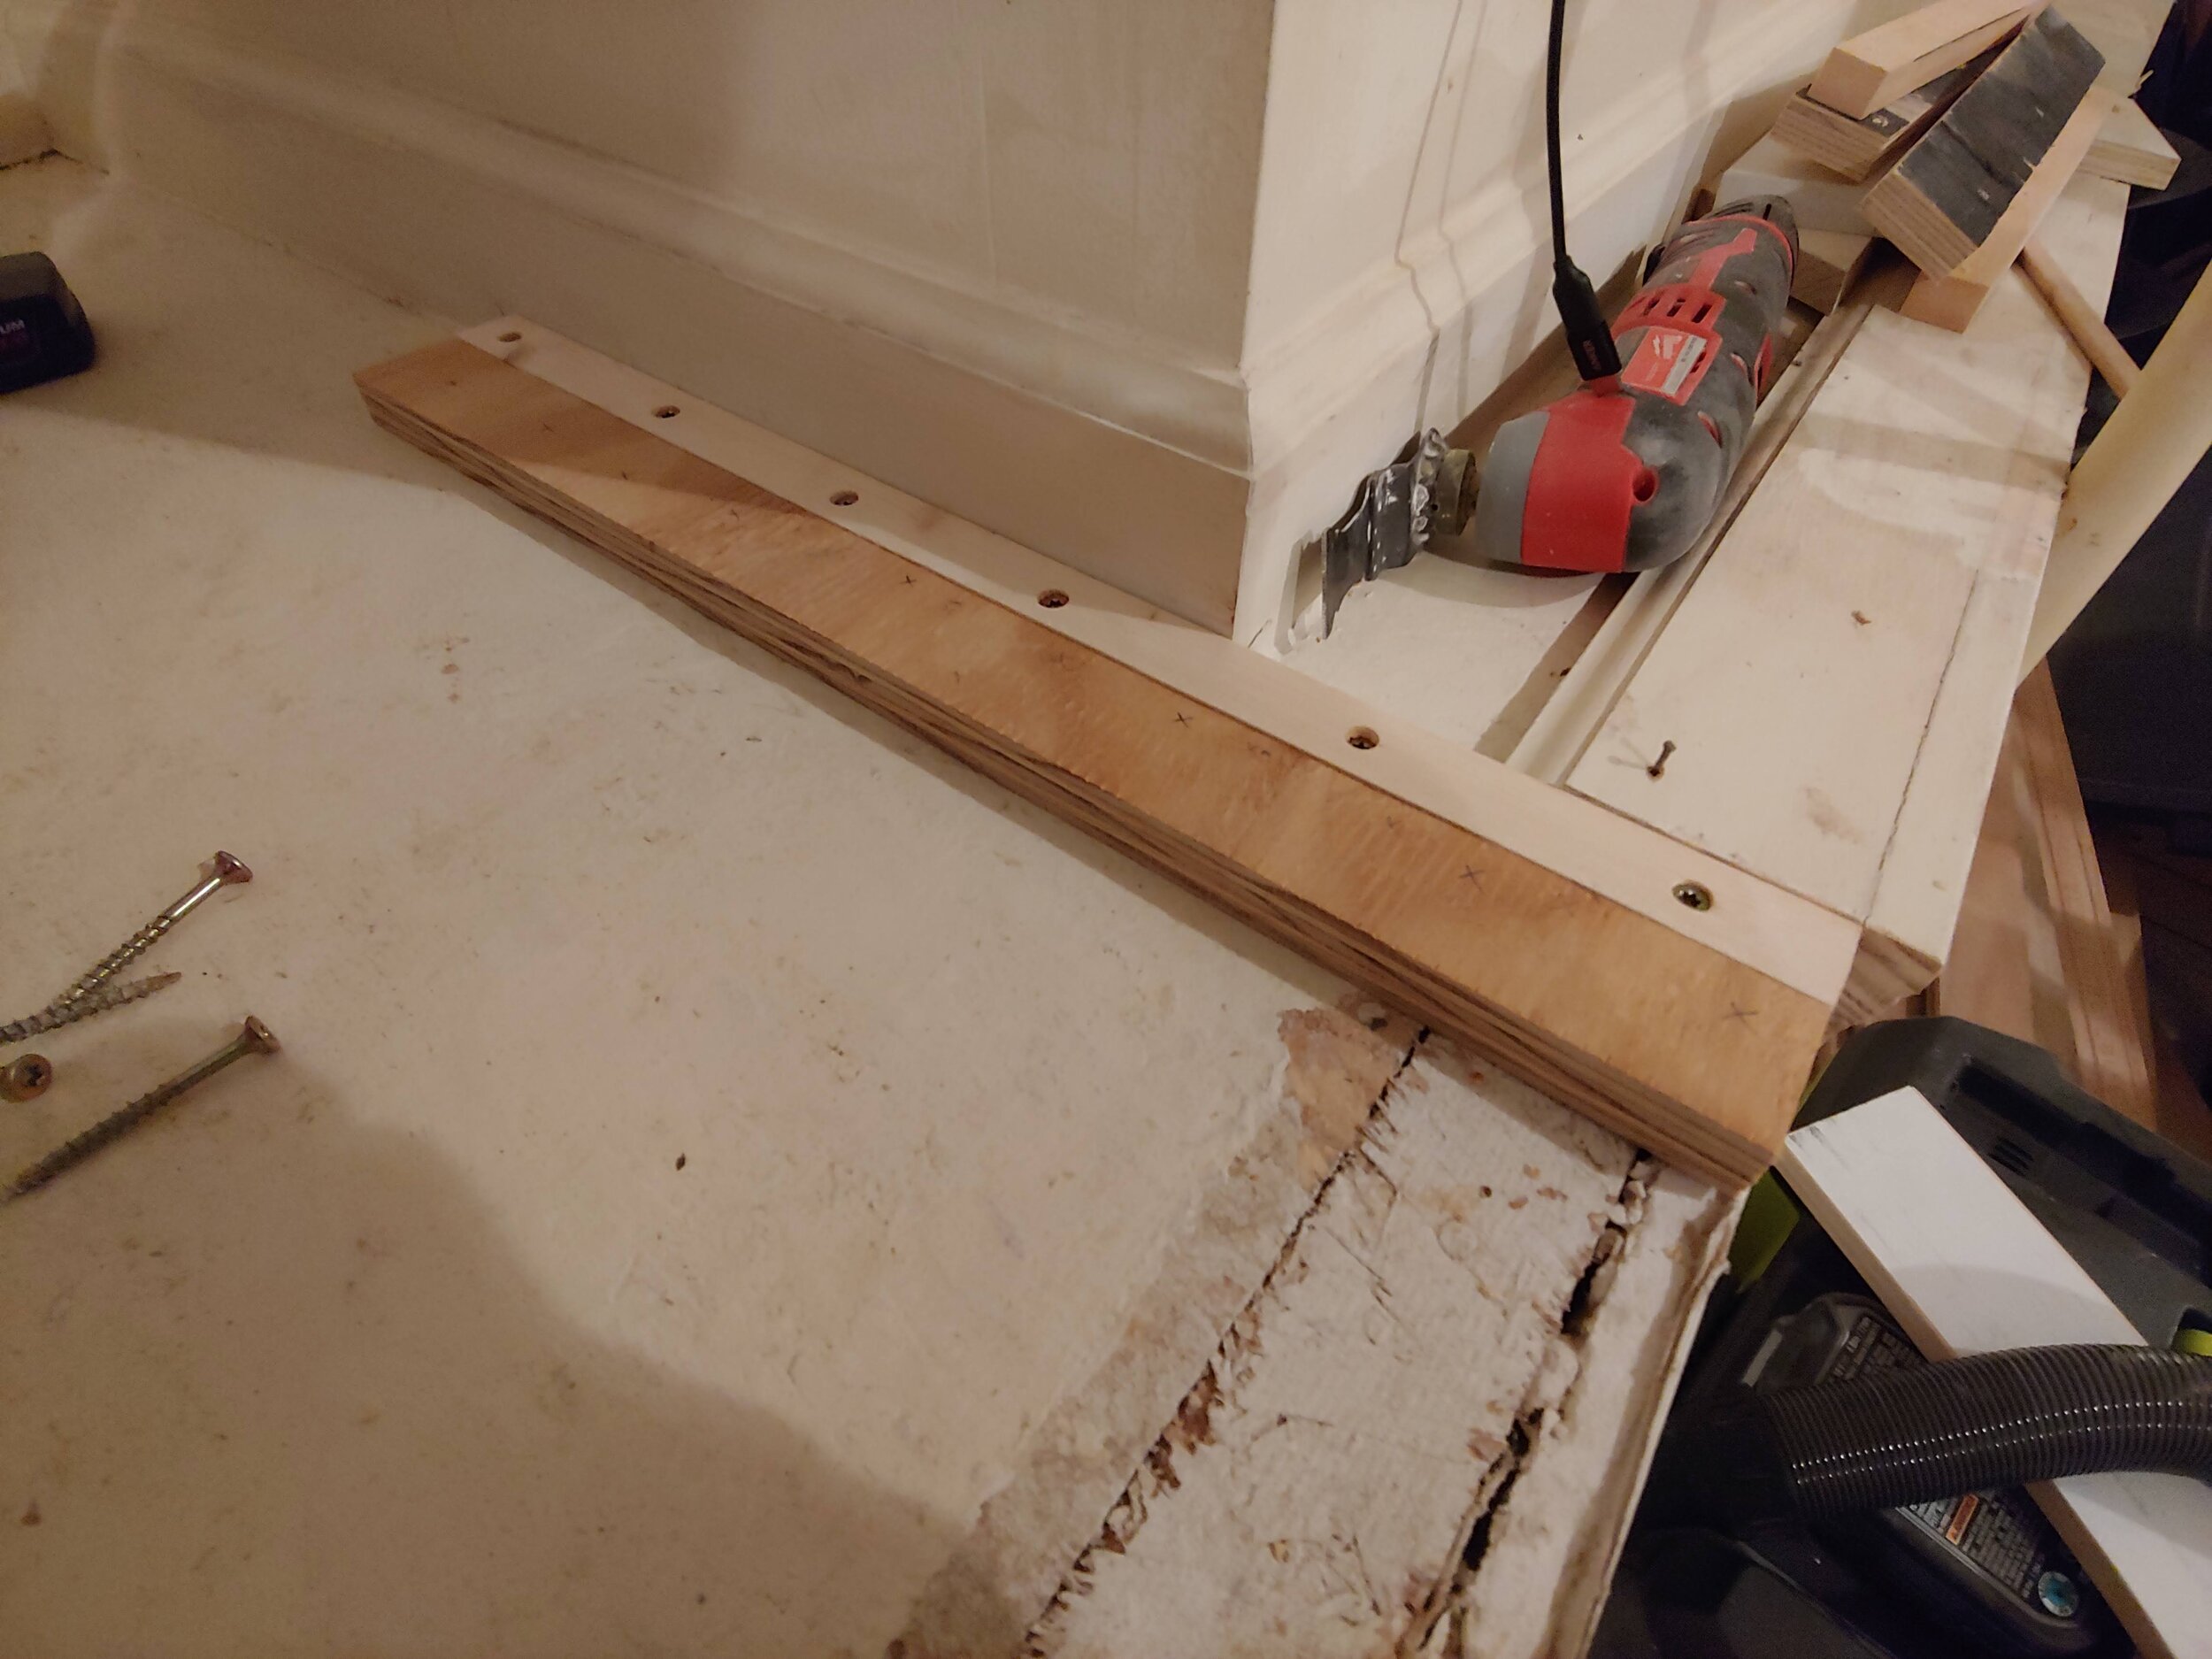
I first countersunk and screwed down, using an impact driver and construction screws, a 19 in long by 1 in wide by 7/8 in tall piece of wood that I ripped from a 2x4 on my table saw for the bottom of the slide guide. I made it 19 inches long which is half the length of the shelf (38 in) so that the shelf can only slide out halfway. Any father and you’d risk not having enough to support the shelf when it’s pulled out and/or the slide guide pulling away from or breaking off what it’s attached to.
I cut a 19” by 1 1/2” strip out of the 3/4” plywood shelving material to be the top of the slide guide and marked the screw locations on this top piece to be in between the screws of the base piece.
Then I countersunk and screwed the top piece down into the bottom. Make sure to predrill the holes on the ends of the base to prevent splitting! Something I would obviously never forget to do.
I repeated the slide guide for the other side and cut out a 22 1/2” by 38” by 3/4” piece of plywood for the bottom shelf. I cut a 4” by 2” hole in the shelf set back 1 inch from the front edge using my jigsaw to give me a handle to pull the shelf out with.
I put small wood screws in the back corners of the shelf to keep it from pulling out past the slide guides.
I cut and attached a long 2x4 set back about 3 inches at the side of the shelf that extends up to within a half inch from the ceiling. This piece gives the front edge of the shelf frame something to attach to. It was wobbly at first but stiffened up as more shelves were added.
Next, to make the shelf frame I mentioned earlier. I cut 2x4s using a speed square and a circular saw (my miter saw was MIA at the time) and built a frame for the first shelf out of the 2x4s, attaching them through the sides of the longer pieces into the ends of the shorter pieces using construction screws. I left the front piece off for now so this frame is 1 1/2 inches less that the total depth of the shelf will be.
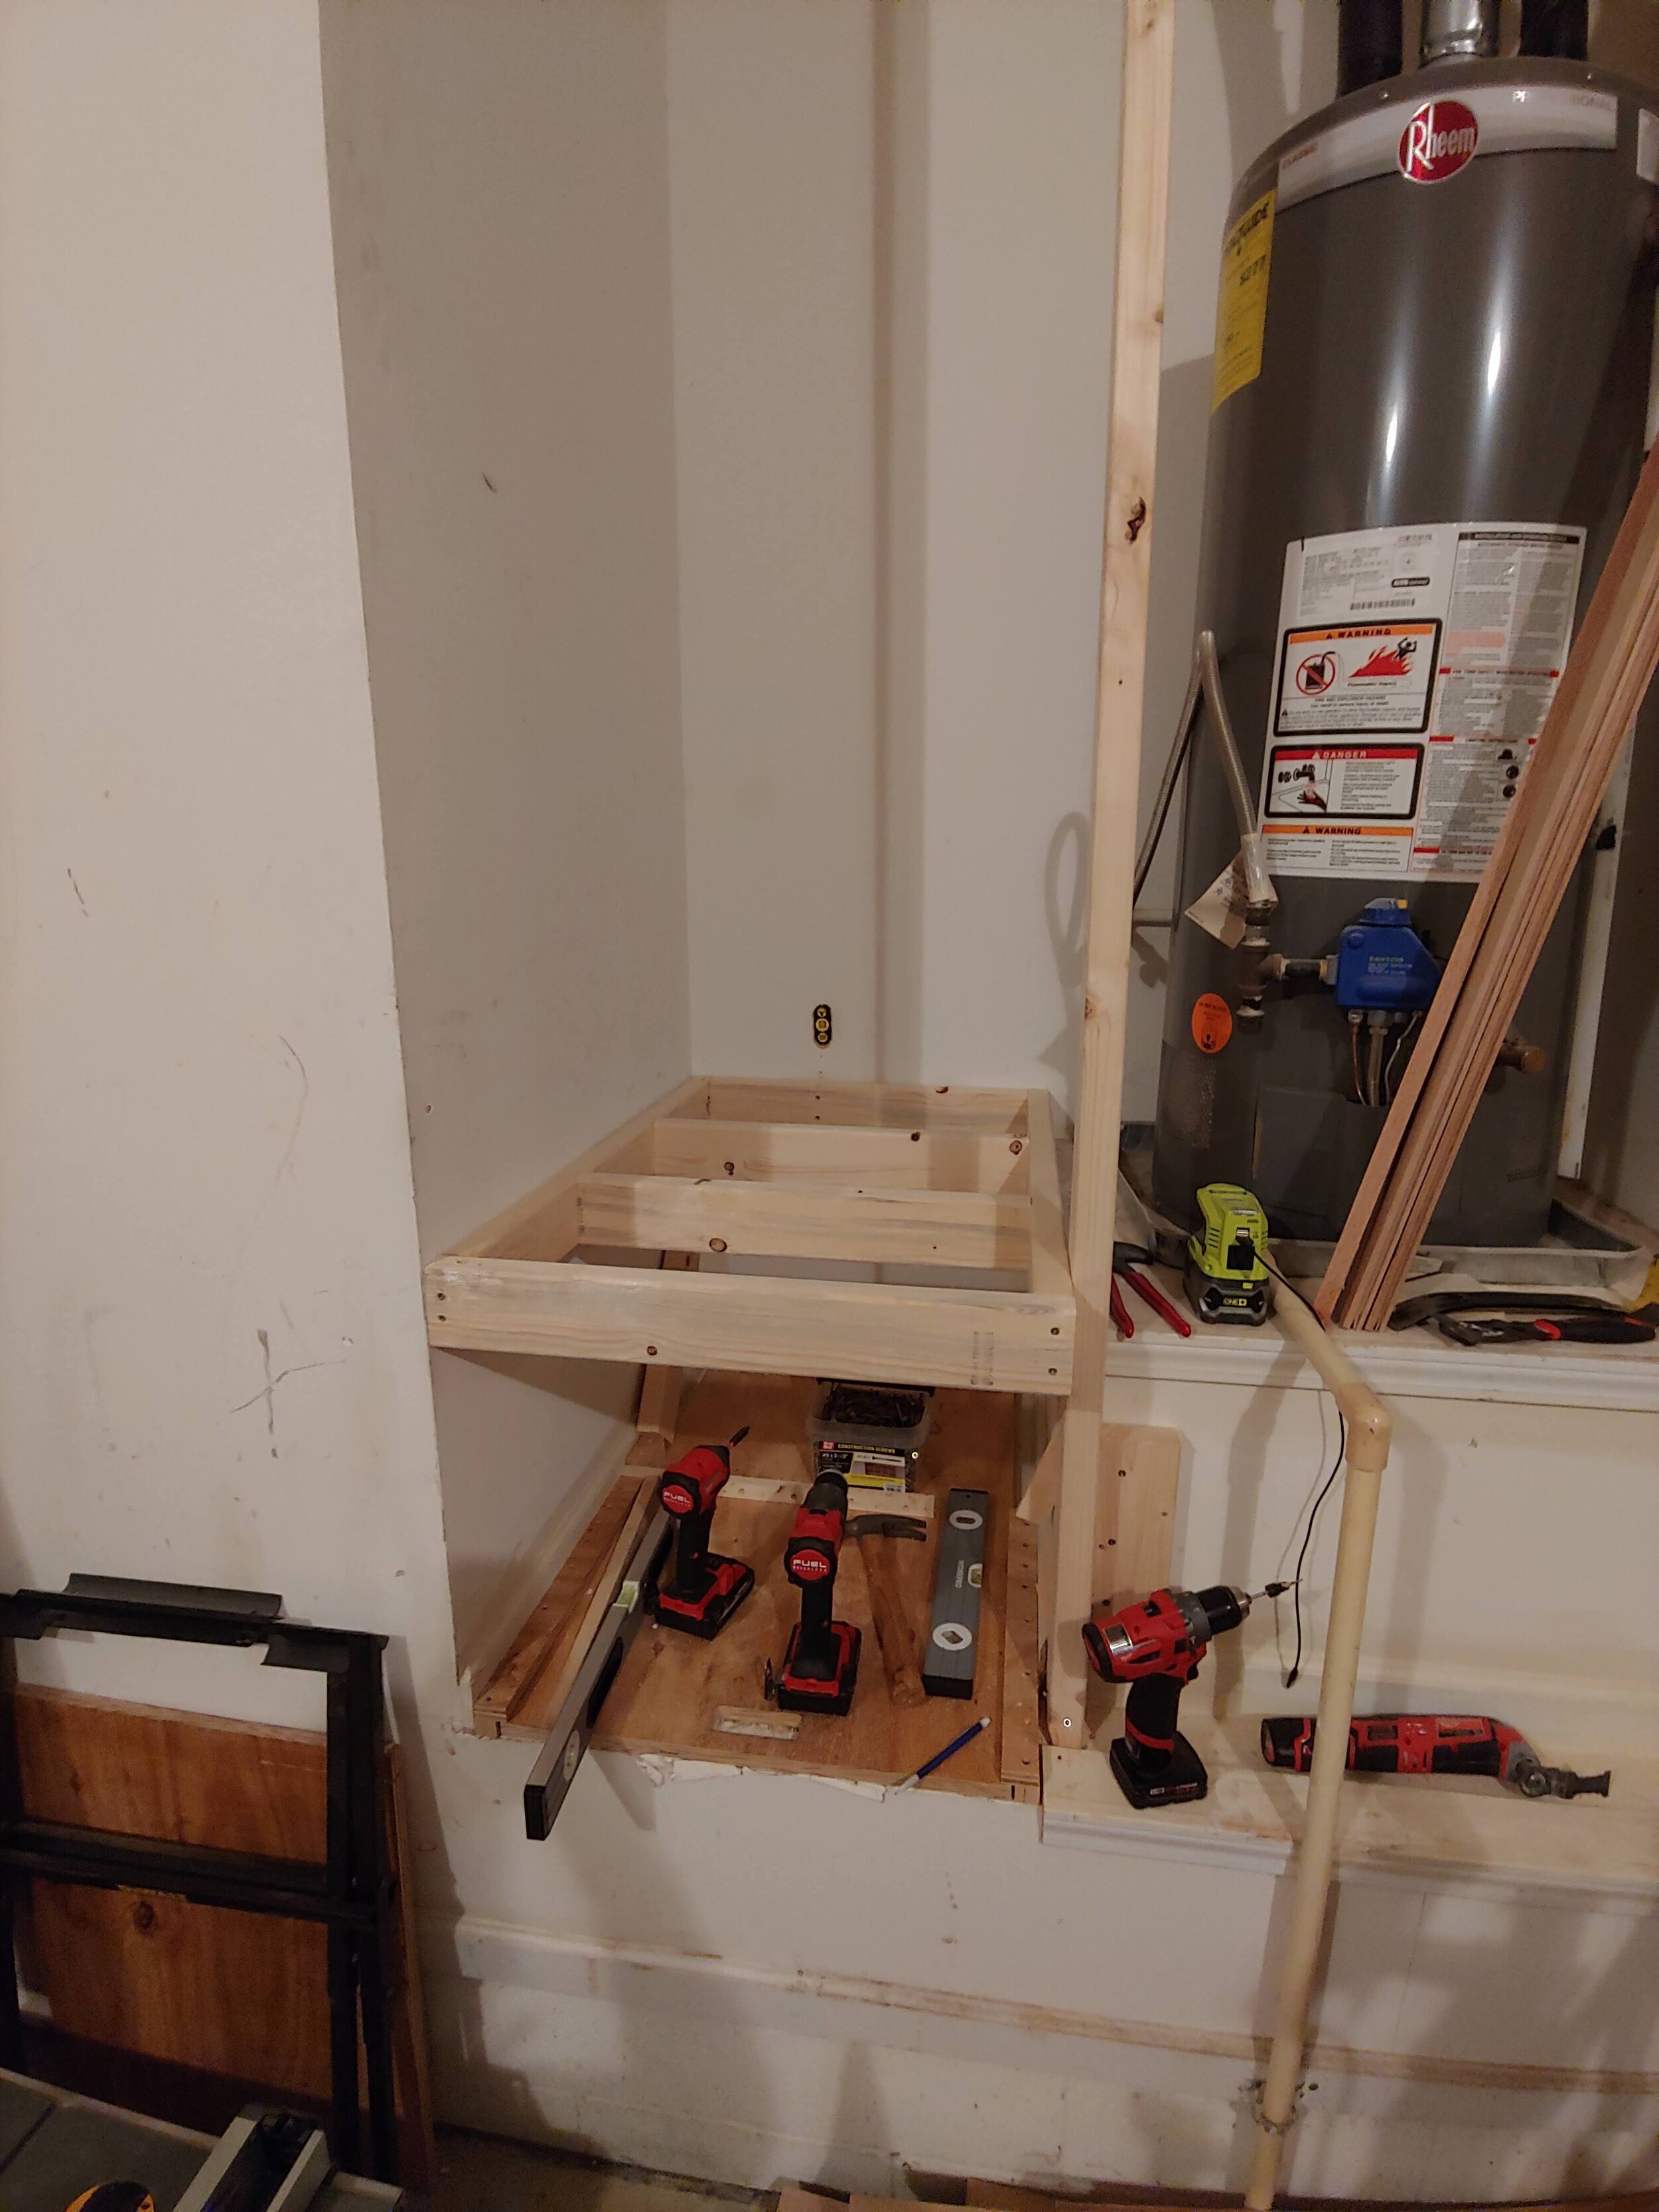
I used a stud finder to find the wall studs (where possible), leveled the shelf frame in both directions, and attached it to the studs first with construction screws to hold it in place and then lag screws. The ones that I’ve linked in the materials are significantly easier to install than traditional lag screws. I put my shelves 18 inches apart, from the top of the lower shelf to the bottom of the shelf frame, as this was tall enough for me fit in most tools, or stack 2 storage bins I had on top of each other, and when repeated up the wall would leave a good size opening from the top shelf to the ceiling. I also screwed on the front of the shelf frame with construction screws.
There isn’t a wall stud near the back right corner of the shelf frame so I added another long 2x4 here where the bottom rests on the platform below and the top ends just below the ceiling and screwed the shelf frame to it.
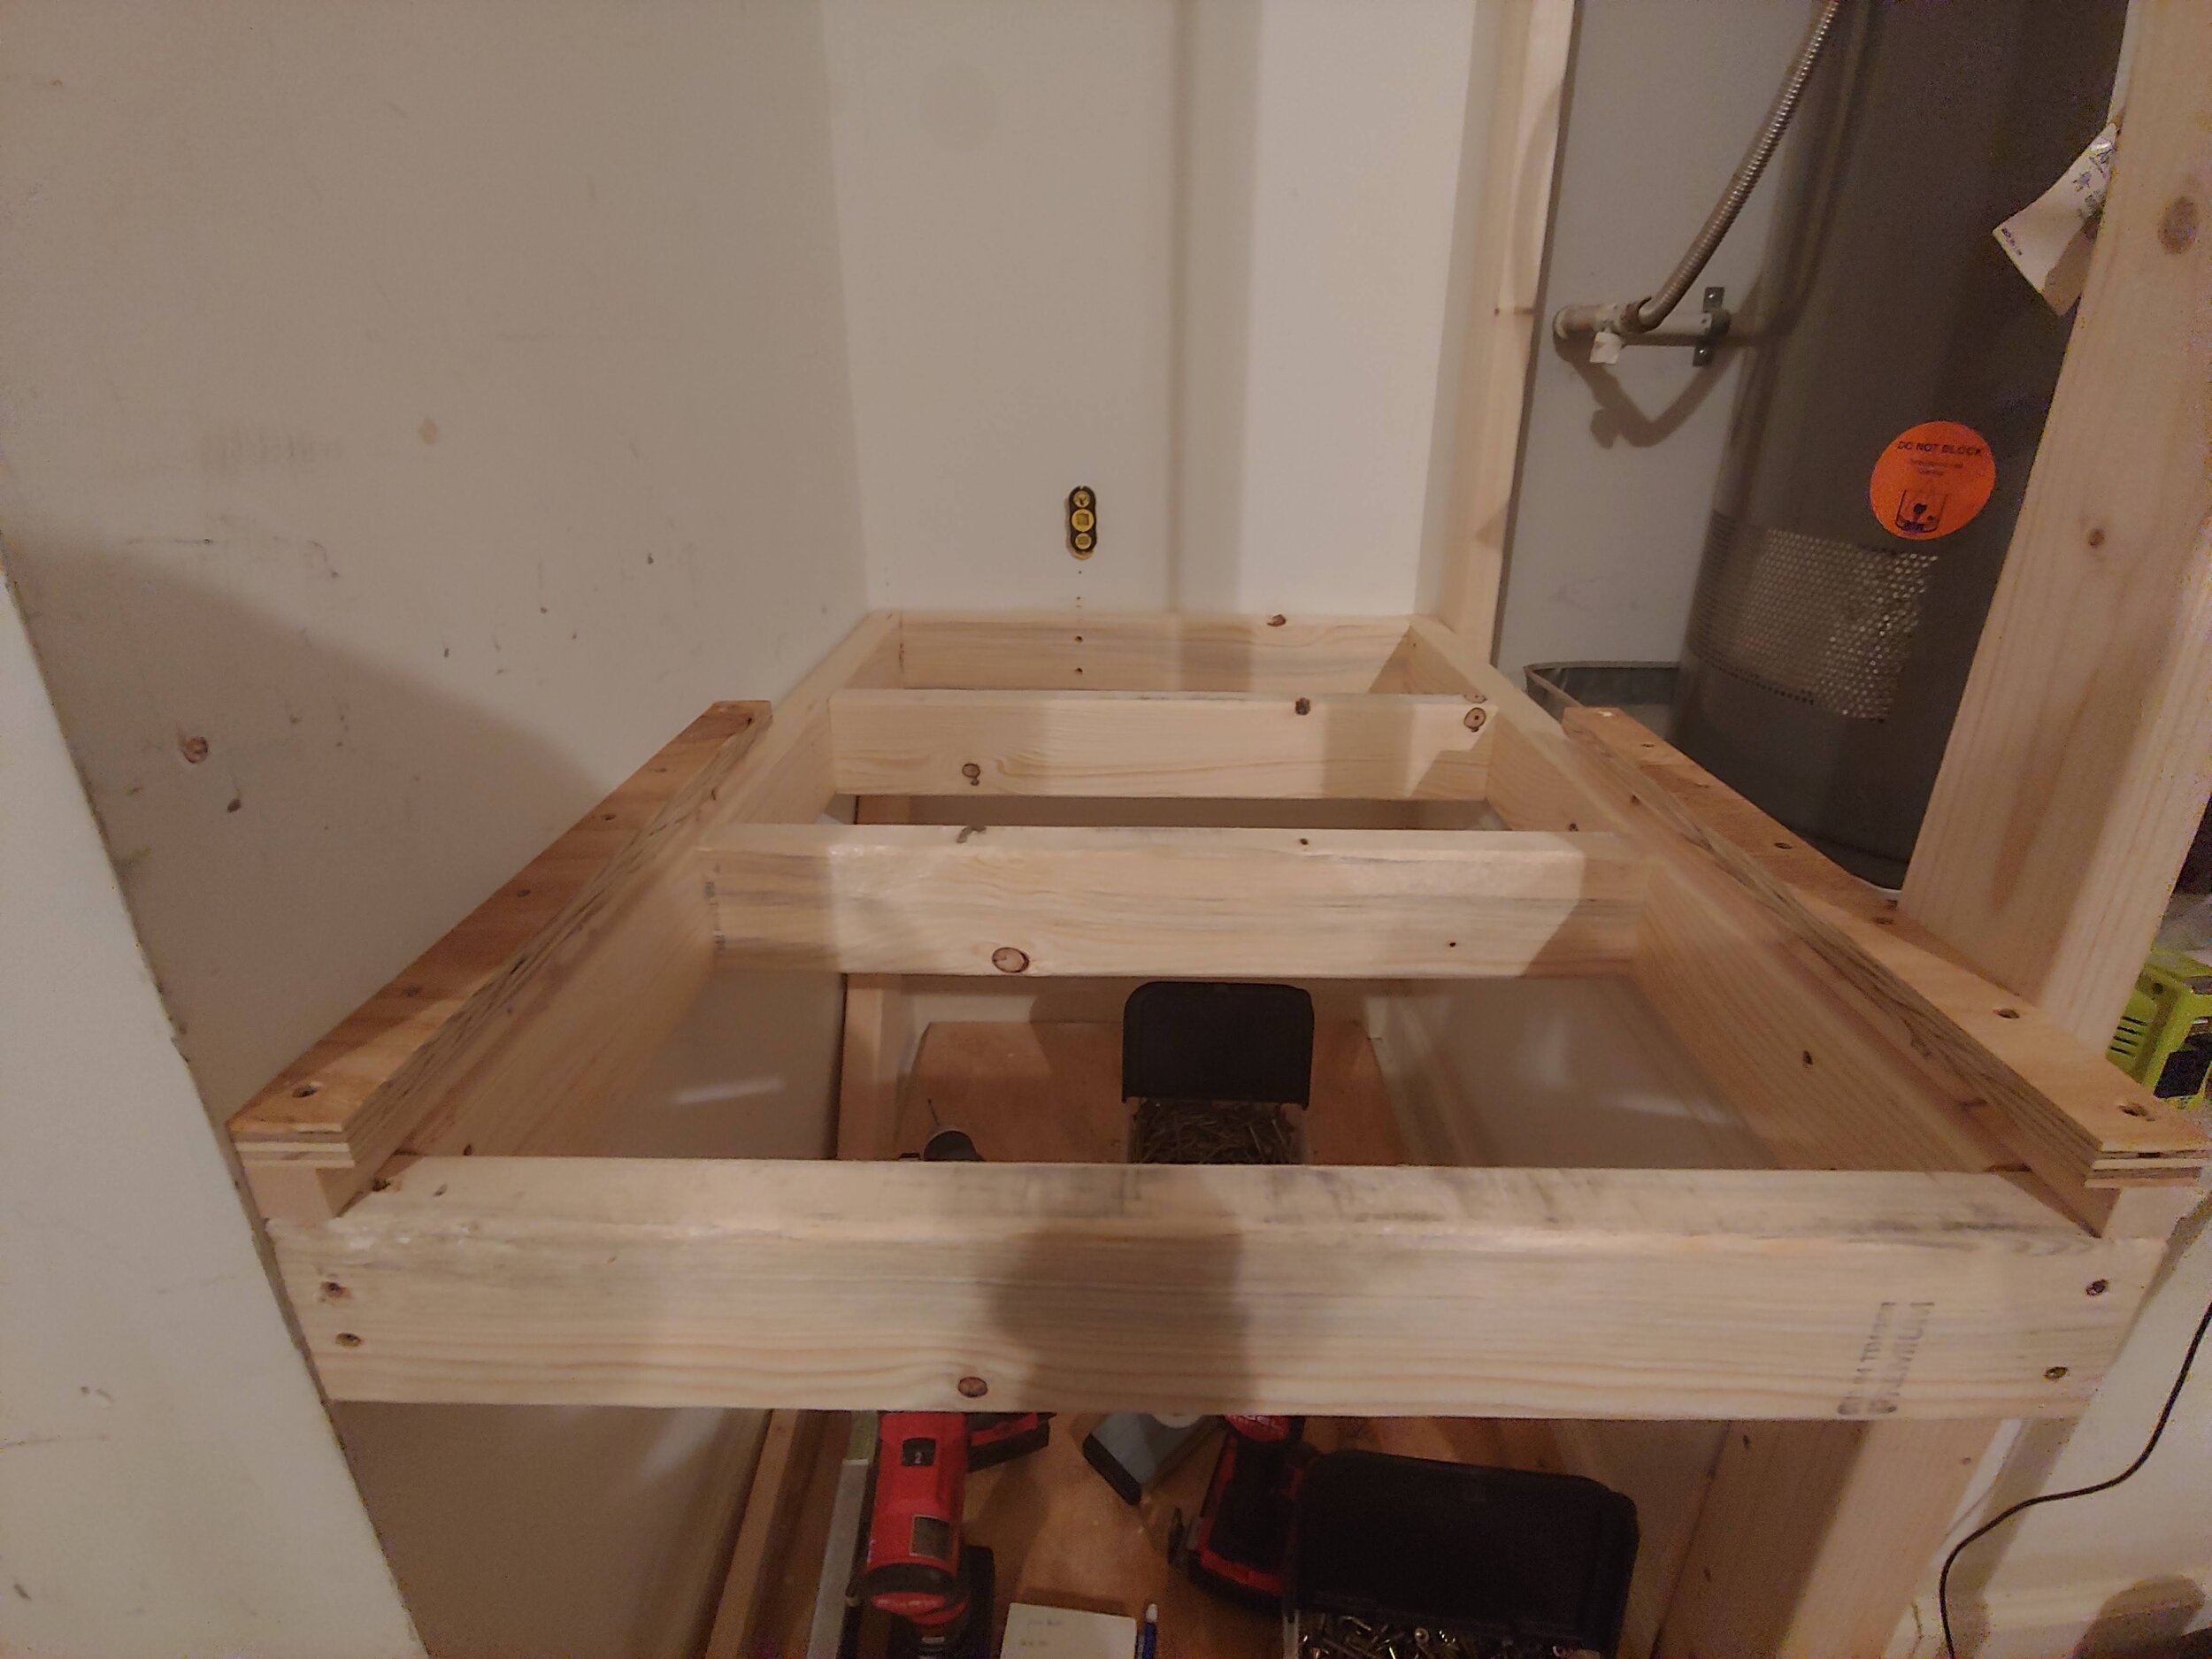
Then I added 2 more slide guides to this frame so it can also have a slide out shelf. Notice that I did NOT split these! (because I would never)
I added a small piece of 2x4 to the middle backside of the front of the frame which will be below the cut out for the handle hole in the shelf. This piece keeps your hand from being able to go all the way through the hole and getting pinched when you pull the shelf out. Ask me how I know…
Here it is after adding the next slide out shelf.
It’s the same process for adding the rest of the shelves except I pieced together a support from 2x4s that is 18 inches tall (the same distance as the first shelf opening) to hold each subsequent shelf frame to the right height. This made it a whole lot easier to level and put up the rest of the shelves and I highly recommend making a support like this if your shelves are going to be evenly spaced.
The shelves from here on up are too high off the ground for the slide out feature to be useful so I just cut a rectangular piece for the top and screwed it down using wood screws. In general, the further below arm level a shelf is, the more useful it being able to slide out will be.
I added 2 more shelves up to the top. I also screwed a support to the ceiling joists and screwed the upright 2x4s into that. Now we can call this project done!
Next came the fun part of loading the shelves up with lots of tools and materials! The slide out feature lets me easily load a fairly heavy tile saw and hide it away.
These shelves provide a lot of space in an area that previously was mostly wasted space. They’re a big step in the right direction for me to clean up the garage and have an optimal working space. For now, I have to use a stepladder to reach the shelves up high but I have an idea in mind for a ladder system that I’m going to make that I’ll be able use to reach all the different shelves/lofts that I’m going to be putting in the garage in the future (and you won’t want to miss that!)
I'd love to hear any questions or thoughts about making the slide out shelves that you might have so be sure to let me know in the comments!
If you're not already subscribed to Project Billd content you can do that here and if you want to see more projects like this one be sure to check out my other projects on this site!
Until next time, Go Billd Yourself!
Don’t miss a thing!
Subscribe to get the latest content
Making a Rotating and Flip Up Hidden Tool Storage Workbench
In this video we're making a really cool workbench that hides a whole bunch of tools under the table when you don’t need them but rotates and/or flips them up to the top when you do need them!
I work in a 2 car garage and while I'm very grateful for the amount of space that I do have, it still gets cramped at times between all the tools, materials, and clutter from working on multiple projects at once. To help with that I decided I'd like to consolidate most of my bench mounted tools into one workbench that also doubles as an infeed or outfeed table when I need it to. I also added drawers at the bottom to help with storing accessories and materials related to the tools mounted to the table (pocket hole screws anyone?)
This workbench turned out awesome and is definitely one of the coolest things I've taken from an idea to reality so far.
Resources:
Disclaimer: The following post contains affiliate links. If you purchase a product through one of the links, I may receive a small commission (at no cost to you) that I can use to feed the platypus. And it’s always hungry.
(most materials available at your local home improvement store)
2 x 4 x 8 Pine Boards
2 x 3 x 8 Pine Boards
3/4" Maple Plywood
1/4" Maple Plywood
Construction Screws (2", 2 1/2", 3")
Wood Screws (3/4", 1 1/4")
HD Pocket Hole Screws
5/16 Bolts/Washers/Stop Nuts for Mounting Tools
Fender Washers for Shimming Plywood
1/8" Polycarbonate
3/4" Steel Rod
Paraffin Wax
3/4" Shaft Collar
Threaded Inserts (M8-1.25)
4 Star Knobs (M8*70)
6 Star Knobs (M8*30)
Toggle Latches
Cabinet Pulls
Superglue
Casters
14 Five Knuckle Hinges
16" Drawer Slides
(in order of appearance in the video)
Miter Saw
Impact Driver
Table Saw
Brad Nailer
Quick Grip Bar Clamps
HD Pocket Hole Jig
Portable Drill
Speed Square
Centerpunch
Portable Drill Guide
Hole Saws (3/4", 2 1/8")
Drum Sander Bits
Angle Grinder
Circular Saw
Clamping Straight Edge Guide
Jigsaw
Circular Saw Rip Fence
Ratcheting Screwdriver Set
Countersink Drill Bits
Forstner Bits
Tools Mounted to the Workbench:
Thickness Planer
Scroll Saw
Pocket Hole Jig
Bench Sander
Dovetail Jig
If you liked the video be sure to give it a thumbs up on YouTube and I'd love to hear any questions or thoughts about making the workbench that you might have so be sure to let me know in the comments section!
If you're not already a subscriber consider subscribing and if you want to see more projects like this one be sure to check out my other projects on this site!
Until next time, Go Billd Yourself!
Don’t miss a thing!
Subscribe to get the latest content
How to Make Small Closet Built-Ins
Small closet organization can be a pain. Most often a small closet has one wire shelf and… well that’s it. Which is a waste of valuable storage space!
I've been thinking of small closet organization and built-ins ideas for a while and I’ve come up with a design that I feel really maximizes the typically wasted vertical space in a closet by adding 8 drawers at the bottom sides of the closet. However, the storage options remain really flexible due to adjustable shelves so you can customize them to store things however you see fit.
In this video I’ll show you step by step how I made the built-ins so that you can recreate them for yourself and upgrade your small closet!
Resources:
Disclaimer: The following post contains affiliate links. If you purchase a product through one of the links, I may receive a small commission (at no cost to you) that I can use to feed the platypus. And it’s always hungry.
(most materials available at your local home improvement store)
1/2" Plywood
1/4" Plywood
3/4" Plywood
1/4" Maple Plywood
1/2" Maple Plywood
1" x 8' Clear Pine
3/8" Wood Dowel
Wood Filler
Wood Shims
Cabinet Screws (2 3/4")
Construction Screws (2")
1/8" Tile Spacers
Wood Screws (1 1/4", 1")
Primer
Semi-Gloss White Paint
White Latex Caulk
Wood Glue
13/16" Birch Edge Banding
Pocket Hole Screws (1", 1 1/4")
12" Drawer Slides
5/8" Maple Edge Banding
#8 Flat Washers
Double Sided Tape
Closet Shelf Bracket
#10 Stainless Steel Screws (1 1/2", 3/4")
96" Closet Rod
Closet Rod Brackets
5mm Shelf Pins
(in order of appearance in the video)
Measuring Tape
Laser Level
Oscillating Multitool
Utility Knife
Molding Bar
Painters Tool
Table Saw
Miter Saw
Wood Glue Brush
Brad Nailer
Jigsaw
Quick Grip Bar Clamps
Iron
Edge Banding Trimmer
Portable Drill
Pocket Hole Jig
Speed Square
Torpedo Level
Finish Nailer
Impact Driver
Stud Finder
24" F Clamps
Countersinking Drill Bits
Putty Knife
Random Orbital Sander
Shelf Pin Jig
Spring Loaded Centerpunch
Hex Drill Bits
Drawer Slide Jig
Magnetic Featherboard
Circular Saw
Soft Hammer
Ratcheting Screwdriver
Flush Trim Router Bit
Router Table
Handheld Router
Router 1/16" Round Over Bit
Caulk Gun
Right Angle Adapter
Angle Grinder
If you liked the video be sure to give it a thumbs up on YouTube and I'd love to hear any questions or thoughts about making the small closet built-ins that you might have so be sure to let me know in the comments section!
If you're not already a subscriber consider subscribing and if you want to see more projects like this one be sure to check out my other projects on this site!
Until next time, Go Billd Yourself!
Don’t miss a thing!
Subscribe to get the latest content
Making a Phone and Smartwatch Hidden Wireless Charging Station
I made a walnut hidden wireless charging station to charge my phone and smartwatch at the same time. Check out the video above to see how I did it!
Resources:
Disclaimer: The following post contains affiliate links. If you purchase a product through one of the links, I may receive a small commission (at no cost to you) that I can use to feed the platypus. And it’s always hungry.
(most materials available at your local home improvement store)
1/4" Plywood (for making router templates)
3/4" Thick Walnut Lumber
Wireless Charger
Zero4U USB Hub (no pogo pins)
USB C Extension Cable
JST-XH 2.54mm Female Connector
USB-A Right Angle Extension Cable
USB-A to USB-C Cable
2+ Amp Wall Charger
Double Sided Tape
Superglue
Wood Glue
Disk Magnets
Satin Polyurethane Spray
Heat Shrink Tubing
Mini Screws (hold on usb hub)
Zip Ties
(in order of appearance in the video)
Dust Mask
Speed Square
Router
Router 3/8" Pattern Bit
Router Circle Cutting Jig
Bench Vise
Nylon Vise Jaw Covers
Spring Loaded Centerpunch
Portable Drill
Forstner Bits
Chisels
Miter Saw
Quick Grip Bar Clamps
Wood Glue Brush
Circle Marking Template
Table Saw
Band Saw
Rotary Tool
Drill Press
Drill Press Vise
Bench Sander
Router Table
Random Orbital Sander
Mini Screwdriver
Wire Strippers
Soldering Iron
Soldering Helping Hands Vise
Heat Gun
Hot Glue Gun
If you liked the video be sure to give it a thumbs up on YouTube and I'd love to hear any questions or thoughts about making the charging station that you might have so be sure to let me know in the comments section!
If you're not already a subscriber consider subscribing and if you want to see more projects like this one be sure to check out my other projects on this site!
Until next time, Go Billd Yourself!
Don’t miss a thing!
Subscribe to get the latest content
How to Build a Privacy Fence with Hidden Gates
I made a privacy fence with secret gates that blend into the fence!
Disclaimer: The following post contains affiliate links. If you purchase a product through one of the links, I may receive a small commission (at no cost to you) that I can use to feed the platypus. And it’s always hungry.
3/4x6x6 Pressure Treated Pine Pickets
4x4x8 Pressure Treated Pine Posts
1x6x8 Pressure Treated Pine (top cross pieces)
1x4x8 Pressure Treated Pine (middle and bottom cross pieces)
2x4x8 Pressure Treated Pine (top rails)
1 ½ Inch Gold Coat Framing Angles (brackets)
9-Gauge Galvanized Steel Joist Hanger Nails (for attaching brackets to post)
#8 x 1 ¼ Inch Exterior Rated Cabinet Screws (for attaching brackets to cross sections)
#8 x 1 ¼ Inch Tan Exterior Star Drive Screws (for attaching pickets to cross sections)
3 inch Tan Deck Screws (for attaching top rail to posts and fence section)
8.09 Inch Steel-Painted Gate Hinges
Steel-Painted Gate Auto Latch
1/16 inch Galvanized Steel Cable
1/16 Ferrule and Stop Kit
4x4 Solid Copper Post Caps
Exterior Construction Adhesive
Carpenters Pencil (works way better for marking on wet pressure treated wood)
Speed Square
Drill and Drill Bits
Autohammer/Hammer
Ear Protectors
Miter Saw
Impact Driver
Portable Circular Saw
Digital Angle Finder
Straight Edge (can be a straight piece of wood)
Measuring Tape
Trigger Bar Clamps
Impact Sockets (or socket wrench for installing gate hinges)
End Cutting Pliers (for crimping ferrules)
Torpedo Level
Caulk Gun
Rough Grit Sandpaper (I used 120 grit)
If you liked the video be sure to give it a thumbs up on YouTube and I'd love to hear any questions or thoughts about making the fence that you might have so be sure to let me know in the comments section!
If you're not already a subscriber consider subscribing and if you want to see more projects like this one be sure to check out my other projects on this site!
Until next time, Go Billd Yourself!
Don’t miss a thing!
Subscribe to get the latest content


